

Furnishing Tips

La Stanza Unplugged: Come Progettare uno Spazio Domestico che Recupera Davvero
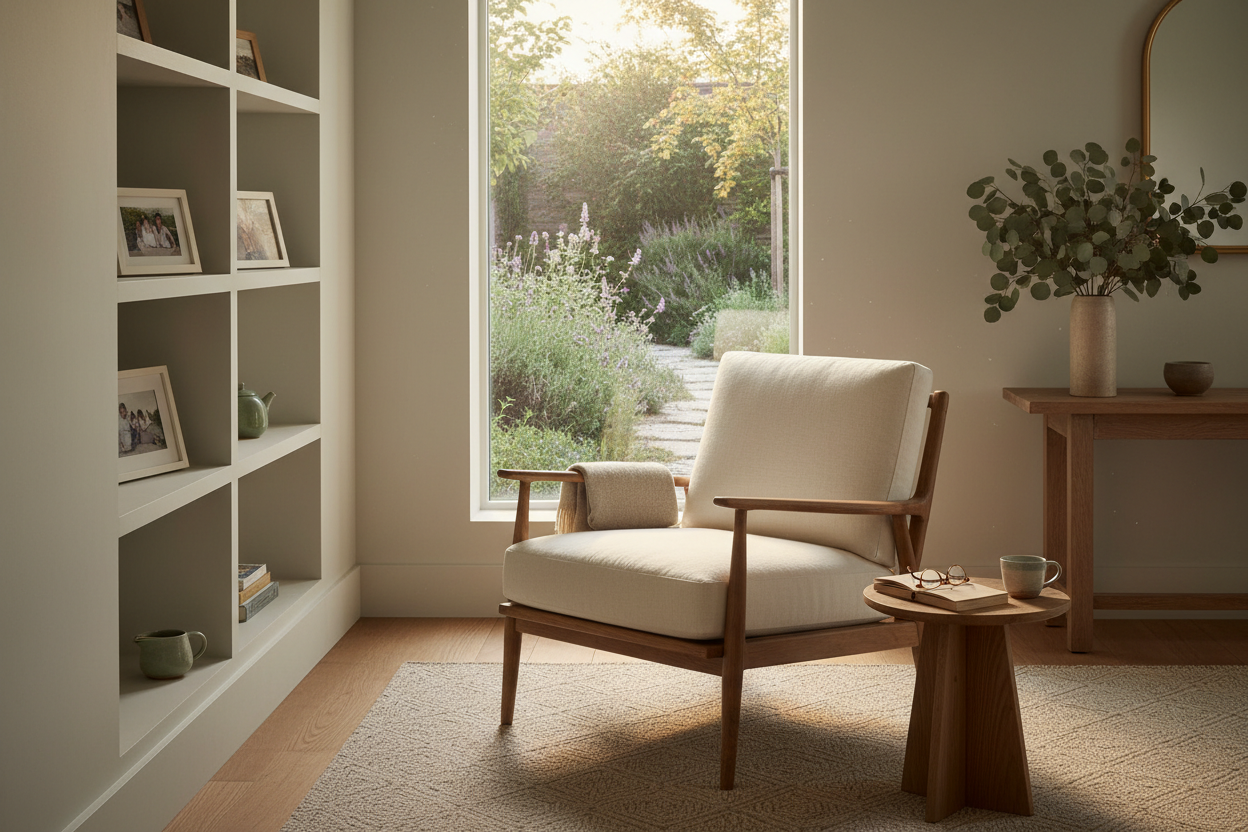
La Stanza Unplugged: Come Progettare uno Spazio Domestico che Recupera Davvero Cos'è una stanza unplugged? È uno spazio domestico progettato intenzionalmente senza schermi, senza notifiche, senza la presenza visiva della tecnologia. Non è una stanza buia e vuota: è uno spazio pensato per fare esattamente il contrario di quello che fanno gli schermi, ovvero rallentare, recuperare energia, stare presenti. I materiali sono naturali, la luce è calda e dimmerabile, i suoni sono assorbiti invece che amplificati. È la risposta progettuale a un bisogno che sempre più persone riconoscono ma pochi sanno come realizzare concretamente. In sintesi: la stanza unplugged non è una tendenza estetica. È una scelta funzionale che risponde a un dato preciso: gli adulti italiani trascorrono in media 6-7 ore al giorno davanti a uno schermo. Lo spazio domestico è l'unico contesto in cui quella disconnessione è davvero possibile, ma solo se è progettato per supportarla invece di ostacolarla. Cosa trovi in questa guida. Cosa rende uno spazio davvero unplugged dal punto di vista progettuale, i materiali e la luce che favoriscono la disconnessione, come si integra questo concetto in un appartamento normale senza stravolgere tutto, il collegamento con la psicologia degli spazi domestici e le scelte concrete da fare prima di comprare qualsiasi cosa. Perché lo Spazio Conta più della Forza di Volontà Decidersi di staccare dal telefono non funziona quasi mai. Non perché manchino la volontà o la consapevolezza, ma perché l'ambiente in cui si sta non supporta quella intenzione. Uno studio condotto dall'Università di Texas ha dimostrato che la sola presenza visiva dello smartphone, anche se spento e capovolto sul tavolo, riduce le capacità cognitive disponibili. Non serve che suoni. Basta che sia lì. La stessa logica si applica a tutto lo spazio: un ambiente con schermi visibili, cavi in vista, luci fredde e superfici che riflettono la luce artificiale comunica al sistema nervoso uno stato di allerta e disponibilità che rende il recupero molto più difficile. Non è una questione di autodisciplina. È una questione di design. Carl Gustav Jung, che abbiamo già citato nell'articolo sulla psicologia degli spazi domestici, descriveva la casa come una seconda pelle: il luogo dove la maschera sociale può finalmente abbassarsi. Quella maschera oggi include anche il ruolo di essere sempre connessi, sempre raggiungibili, sempre produttivi. La stanza unplugged è il posto dove quella maschera si toglie fisicamente, non solo metaforicamente. Cos'è Davvero una Stanza Unplugged: La Definizione Progettuale Una stanza unplugged non si definisce per l'assenza di tecnologia ma per la presenza di qualcosa di alternativo. Non è la stanza dove il telefono è vietato: è la stanza dove non viene naturale cercarlo. Dal punto di vista progettuale ha quattro caratteristiche precise. La luce è calda e controllabile La luce è la variabile più importante. La luce a 6500K di uno schermo blocca la produzione di melatonina e segnala al cervello che è ancora giorno. La luce a 2700K, dimmerabile, fa l'opposto: prepara il sistema nervoso al rilassamento. In una stanza unplugged non ci sono luci a soffitto fisse e non dimmerabili. Ci sono lampade a diverse altezze, con temperatura di colore calda, controllabili individualmente. La luce naturale è valorizzata al massimo durante il giorno, filtrata ma non bloccata durante le ore di punta. I materiali sono naturali e tattili La ricerca sulla biofilia dimostra che il contatto con materiali naturali, legno, lana, lino, pietra, riduce i livelli di cortisolo in modo misurabile. Non è estetica: è fisiologia. In una stanza unplugged le superfici si toccano con piacere. Il legno non è laccato ma trattato in modo da lasciare la venatura visibile e il calore tattile. I tessili sono in lino grezzo o lana a trama grossa, non in microfibra sintetica. Il pavimento, dove possibile, è in materiale naturale: legno, pietra, cotto. L'acustica è curata Gli spazi moderni tendono ad essere molto riverberanti: pavimenti duri, pareti lisce, poche superfici fonoassorbenti. Il risultato è un ambiente sonoro che amplifica ogni rumore e mantiene il sistema nervoso in uno stato di leggera allerta continua. In una stanza unplugged i tessili assorbono il suono: tappeti spessi, tende pesanti, cuscini in lana, librerie piene di libri. Il silenzio non è assenza di suono ma riduzione della riverberazione. La differenza si sente fisicamente dopo pochi minuti. Il layout favorisce la postura del riposo Una sedia da ufficio comunica "stai lavorando". Un divano basso comunica "stai riposando". Il layout di una stanza unplugged privilegia posizioni del corpo associate al rilassamento: sedute basse, superfici per stendersi, angoli raccolti dove appoggiarsi invece di tenersi eretti. Non è necessario comprare nuovi mobili. Spesso è sufficiente riposizionare quelli esistenti, aggiungere un tappeto grande e spostare le sedute dall'orientamento verso lo schermo all'orientamento verso la finestra o verso il centro della stanza. Come si Integra in un Appartamento Normale La domanda pratica è sempre la stessa: non ho una stanza in più. Come faccio? La risposta è che la stanza unplugged quasi mai è uno spazio separato. È una zona intenzionale all'interno di uno spazio esistente. Nel soggiorno L'angolo del soggiorno più lontano dalla televisione, con una poltrona, una lampada bassa, un tavolino per i libri. Non una separazione fisica ma una separazione funzionale: quella zona non ha prese vicine, non ha supporti per schermi, non ha luce diretta dal soffitto. È il posto dove si va a leggere, a pensare, a non fare niente di produttivo. In camera da letto La camera da letto è lo spazio unplugged per eccellenza, o dovrebbe esserlo. Il telefono non entra. La televisione non c'è. La luce è dimmerata dalle 20 in poi. I materiali sono tutti naturali. Questa non è una scelta radicale: è la condizione base per dormire bene, che la ricerca sul sonno conferma inequivocabilmente. In uno spazio dedicato Chi ha la possibilità di destinare uno spazio specifico, anche piccolo, a questa funzione ottiene il risultato migliore. Un ripostiglio trasformato in reading nook. Una stanza degli ospiti che diventa anche spazio meditazione. Un angolo del corridoio con una seduta e una lampada. La dimensione conta meno dell'intenzione progettuale. I Materiali Giusti: La Guida Rapida Categoria Cosa scegliere Cosa evitare Pavimento Legno naturale, pietra, cotto Gres lucido, vinile, moquette sintetica Tessili Lino grezzo, lana, cotone pesante Microfibra, poliestere, tessuti sintetici Illuminazione Lampade a 2700K dimmerabili, candele LED freddi, neon, luci a soffitto fisse Sedute Poltrone basse, cuscini grandi, pouf Sedie ergonomiche da ufficio, sedie alte Colori Neutri caldi, verdi attenuati, terracotta Bianchi freddi, grigi metallici, colori acidi Acustica Tappeti spessi, tende pesanti, librerie Pareti nude, pavimenti nudi, superfici vetrate Gli Errori più Comuni Nascondere la tecnologia invece di escluderla Un cassetto per il telefono, una scatola decorativa per i cavi, un mobile che copre la televisione. Queste soluzioni tengono la tecnologia presente nello spazio anche se non visibile. Il cervello sa che è lì. La risposta psicologica è diversa rispetto a uno spazio dove la tecnologia non esiste. Fare una stanza unplugged esteticamente ma non funzionalmente Materiali naturali, luci calde, piante: sembra una stanza unplugged. Ma se c'è una presa sul muro all'altezza comoda, il caricatore finirà lì. Se c'è una superficie piana vicino alla seduta preferita, il telefono finirà lì. Il design deve rimuovere le prese di corrente dallo spazio o posizionarle in punti scomodi da raggiungere. Pensare che serva uno spazio grande La stanza unplugged più efficace che abbiamo progettato in Restylit era un angolo di 90x90cm in un corridoio: una seduta, una lampada a parete, un piccolo scaffale per i libri. Non era grande. Era intenzionale. Il Collegamento con la Psicologia degli Spazi Nell'articolo sulla psicologia degli spazi domestici abbiamo scritto che lo spazio in cui vivi ti cambia, anche quando non te ne accorgi. La stanza unplugged è la versione più consapevole di quel principio: uno spazio progettato intenzionalmente per produrre un effetto specifico sul sistema nervoso. Non è meditazione obbligatoria. Non è rinuncia alla tecnologia. È riconoscere che il cervello ha bisogno di periodi regolari in cui non elabora stimoli digitali, e che lo spazio può supportare o ostacolare quella necessità. Chi ha una zona della casa progettata per questo non deve decidere ogni sera di staccare. Lo spazio lo fa per lui. Vuoi creare una zona unplugged nel tuo appartamento ma non sai da dove iniziare? In Restylit lavoriamo spesso su questo tipo di intervento: identificare lo spazio giusto, scegliere i materiali, progettare la luce. La consulenza Basic+3D (da €249) mostra con un rendering fotorealistico come sarà quella zona prima di comprare qualsiasi cosa. Prenota ora → Per un confronto rapido su quale spazio della tua casa ha più potenziale per diventare unplugged, la consulenza Basic (€129, videocall 45 minuti) è il punto di partenza. Scopri il pacchetto Basic → FAQ Cos'è una stanza unplugged e perché è diversa da una stanza senza TV? Una stanza unplugged è uno spazio progettato intenzionalmente per favorire la disconnessione digitale e il recupero del sistema nervoso. Non è semplicemente l'assenza di uno schermo: è la presenza di materiali naturali, luce calda e controllabile, acustica curata e un layout che favorisce posture di riposo invece che di lavoro. La differenza rispetto a una stanza senza TV è progettuale: ogni scelta supporta attivamente la disconnessione invece di essere semplicemente neutrale rispetto ad essa. Quanto spazio serve per creare una zona unplugged in casa? Non serve uno spazio dedicato. Le soluzioni più efficaci sono spesso zone intenzionali all'interno di spazi esistenti: un angolo del soggiorno con una poltrona e una lampada bassa, la camera da letto riprogettata senza schermi e con materiali naturali, un angolo del corridoio con una seduta e un piccolo scaffale. La dimensione minima per una zona funzionale è circa 90x90cm. Quello che conta non è la superficie ma l'intenzione progettuale. Quali materiali favoriscono davvero la disconnessione? I materiali naturali hanno un effetto misurabile sul sistema nervoso grazie al principio della biofilia. Legno con venatura visibile, lana a trama grossa, lino grezzo, pietra naturale: questi materiali riducono i livelli di cortisolo in modo documentato dalla ricerca scientifica. I materiali sintetici e le superfici laccate o specchiate producono l'effetto opposto. La luce a 2700K dimmerabile è la variabile singola con l'impatto più alto. È possibile creare una stanza unplugged in affitto senza fare lavori? Sì. La maggior parte degli interventi è reversibile. Tappeti grandi per l'acustica, lampade a piantana con lampadine a 2700K, tessili in lino o lana, copertura temporanea delle prese con mobili posizionati strategicamente. L'unica cosa che non si può modificare facilmente in affitto è la posizione delle prese, ma un mobile posizionato davanti le rende visivamente meno accessibili e psicologicamente meno invitanti. Restylit è una interior design company italiana, interamente online. Rendering 3D fotorealistici, shopping list acquistabili, disegni tecnici per l'impresa. Oltre 500 progetti completati, 4.8/5 su Trustpilot. Scopri tutti i pacchetti →
Learn more
Kids' Bedroom Design: How to Create a Space That Grows With Them (and You Won't Regret in Two Years)
Kids' Bedroom Design: How to Create a Space That Grows With Them (and You Won't Regret in Two Years) How do you design a child's bedroom? By starting from how long that space will last, not from how cute it looks right now. A bedroom designed for a three-year-old is almost always inadequate at seven, and completely wrong at eleven. The choices that age well are those that separate the fixed structure of the space, flooring, wall colour, lighting, from the thematic details that change with age. The structure lasts ten years. The details change in a weekend. In short: the children's bedroom is one of the domestic spaces where people spend the most and regret the most. Not because the choices are ugly, but because they're made based on the child's current age rather than how that space will need to function over the next ten years. A project that accounts for the child's development costs the same but lasts much longer. What you'll find in this guide. The design choices that stand the test of time, those that become obsolete quickly, how to organise the space for different age groups, the right materials, lighting, the role of play and study in the same room, and the connection with the unplugged room theme for children in the digital age. The Problem with Bedrooms Designed for Right Now A bedroom with a princess or dinosaur theme, walls painted bright pink or electric blue, furniture so low it's designed for a two-year-old: it's beautiful right now. In four years the child will be embarrassed to bring friends over. This isn't a whim. It's the normal development of a human being who changes tastes, needs and identity far faster than we change the furniture. The problem isn't choosing the wrong style. It's not separating what needs to last from what can change. A well-designed children's bedroom has a neutral and flexible structure, onto which thematic details are layered like removable elements. The ceiling stays, the walls stay, the floor stays. The prints, the colour of the duvet, the toys on display: those change every year, and that's perfectly fine. The Three Phases of a Child's Bedroom: What Each Age Needs 0-5 years: safety and sensory stimulation At this stage the space needs to be safe above all else. Protected corners, non-toxic materials, nothing that could fall or create hazards. Sensory stimulation is important: vivid but not aggressive colours, materials with different textures, abundant natural light. What almost everyone overestimates at this stage is the amount of space dedicated to toys. Young children play with less and play better. A clear floor to lie and crawl on is more valuable than ten shelves full of toys. 6-10 years: the study zone becomes central This is the change that most surprises parents who hadn't planned for it. At six a child needs a place to study, read and draw. If the bedroom doesn't have an adequate study space, homework happens at the kitchen table or in bed, with all the consequences for concentration and posture. A desk is not optional at six years old. It's the first thing to design for. 11-16 years: privacy and identity At this point the space changes function almost completely. The bedroom is no longer the place where the child plays under parental supervision: it's the place where the young person builds their own identity, meets friends, studies, needs to be alone. The needs at this stage are: privacy from the family, space for social life (even just two or three friends sitting together), a study zone separate from the sleeping zone, and the ability to personalise without overhauling the structure. The Choices That Last Ten Years The floor The floor is the choice with the longest lifespan and the highest cost to replace. A light natural wood floor, or a quality wood-effect porcelain, works from early childhood through adolescence without feeling out of place. A coloured carpet or themed vinyl becomes problematic within a few years. A rug is the right tool for adding warmth and safety in the early years: it changes easily as the child grows. The wall colour The single most-regretted choice in children's bedrooms is the colour. Shocking pink walls, electric blue, acid green: beautiful at three, embarrassing at eight. The wall colour that ages best is a warm neutral with an accent in a muted tone. Warm ivory with a sage green wall, light grey with a terracotta accent. These colours work at every age because they have no specific thematic character. The child's identity is expressed through objects, posters and textiles, all removable and replaceable without any structural work. The lighting A child's bedroom needs three distinct types of light, and almost nobody plans for this at the design stage. General diffused light for when the child is active in the room. Dedicated reading light near the bed or desk. A soft night light for young children who are afraid of the dark. Three separate circuits, dimmable, at 2700K. Cold lighting in children's bedrooms is one of the most common mistakes: it interferes with sleep and creates an office-like atmosphere that neither encourages play nor rest. The desk: designed to grow A height-adjustable desk is the best investment you can make in a child's bedroom. It accompanies the child from six years old through to sixteen without becoming uncomfortable. Many desks designed for young children have fixed heights that are completely inadequate for a thirteen-year-old. A more affordable alternative: a standard adult desk at a standard height, with an adjustable chair. Children adapt more easily than you'd think, and the desk won't become obsolete. The Choices That Become Obsolete Quickly Themed beds The racing car bed, the princess castle, the knight's fortress. It lasts two or three years before the child no longer wants it. High cost, short lifespan. The best solution is a quality standard bed with a removable canopy or decorative structure that creates the atmosphere without being permanent. Very low fixed furniture Furniture designed for young children is unusable for an eleven-year-old. Very tall adult chests of drawers are awkward for a four-year-old. The solution is standard-height furniture with temporary additions: a step stool to reach upper shelves, an internal divider to adapt the drawers. Saturated and thematic colours As already mentioned: wall colours should be neutral. Themes are expressed through textiles, posters and objects, all removable and replaceable without structural work. The Children's Bedroom and the Unplugged Theme This is the connection we want to make explicitly with the unplugged rooms article, because it directly concerns children's and teenagers' bedrooms. Children between 6 and 12 spend an average of 4-6 hours a day in front of a screen. Teenagers even more. The bedroom is almost always where this happens, often late in the evening. A well-designed bedroom supports disconnection without imposing it. This means a few concrete things. The sleeping zone is visually separated from the study zone where the computer sits. The light in the sleeping zone is warm and dimmable, not cold and fixed. There are no convenient power sockets near the bed. There's an accessible bookshelf near the sleeping area that makes reading the natural alternative to screens. This isn't censorship. It's design. Play Space: How Much Is Needed and How to Organise It The optimal amount of play space in a child's bedroom is often much less than parents imagine. Children play better with less material and more free space. A study by the University of Toledo found that children with fewer toys available play more creatively and for longer periods than those with many toys at hand. The design solution that works best is not buying more toy storage: it's reducing the toys present in the room and creating a rotation between what is accessible and what is in storage elsewhere. The clear floor is the most valuable play space. Everything that takes up floor space, furniture included, reduces the room available for the physical play that young children need. How Much Does It Cost to Design and Furnish a Child's Bedroom Costs vary considerably depending on the size of the room and the choices made. Item Indicative cost Notes Bed + quality mattress €500-1,200 Invest in the mattress, not the themed bed Height-adjustable desk €200-600 Long-term investment Wardrobe €400-1,500 Modular is better than fixed Complete lighting €200-500 Three separate light points Rug €80-250 Easy to change Wall painting €150-400 Neutral, not thematic Interior design project €249-499 Avoids mistakes that cost far more Designing your child's bedroom and want a space that works now and in ten years? The Basic+3D consultation (from €249) includes a photorealistic rendering of the bedroom with the right design choices for the child's current and future age. Book now → For quick advice on layout, colours and materials, the Basic consultation (€129, 45-minute video call) is the right starting point. Discover the Basic package → FAQ At what age should you change a child's bedroom to a teenager's room? There's no precise age, but the most significant change comes around 6-7 years old, when school starts and a study space becomes necessary, and again around 11-12 years old, when the need for privacy and identity increases significantly. A bedroom designed with a neutral and flexible structure adapts to these changes with minimal intervention, without having to start from scratch. Is a mezzanine bed a good idea in a small child's bedroom? It depends on the age and ceiling height. A mezzanine bed works well from about age 6 onwards, when the child is old enough to climb up and down safely, and up to about 12-14 years old. It requires a ceiling height of at least 2.70 metres to have a liveable study or play area underneath. In teenagers the mezzanine tends to become uncomfortable because it limits the ability to sit up in bed, which is a position they use often. How do you organise a study zone in a small bedroom? The desk doesn't need to be a large, bulky piece of furniture. A fold-down wall-mounted desk takes up zero space when closed and opens only when needed. A narrow desk (50-60cm deep) with an adjustable chair works well even in spaces under 9sqm. The most important thing is the position: ideally near a window for natural light, and away from the bed to mentally separate study time from rest time. What colours work in a child's bedroom without being too neutral? The colours that work best are muted natural tones: sage green, soft terracotta, deep teal on a single wall, ochre yellow. Avoid saturated primary colours (bright red, electric blue, canary yellow) which tire quickly and don't grow with the child. A muted colour on one wall, with the other three neutral, gives character to the space without locking it into a permanent theme. Restylit is an Italian interior design company, entirely online. Photorealistic 3D renderings, shoppable lists, technical drawings for the contractor. Over 500 completed projects, 4.8/5 on Trustpilot. Discover all packages →
Learn more
Online Interior Designer: Prices, Comparisons and How to Choose in 2026
Online Interior Designer: Prices, Comparisons and How to Choose in 2026 How much does an online interior designer cost in 2026? Prices range from €129 for a quick consultation to €55 per sqm for a complete executive project with technical drawings for the contractor. An online interior designer costs on average 60-70% less than a traditional physical studio, with half the delivery time and no significant differences in quality for the vast majority of residential projects. In short: the choice between an online interior designer and a physical studio is not a question of quality, but of project type and what you need. For those renovating or furnishing an apartment without particular structural complexities, online offers the same result at a much lower cost. For those who need continuous physical presence on site, the physical studio remains the right choice. What you'll find in this guide. The real prices of online interior design services in 2026, the honest comparison between online and physical studio, the difference between an online interior designer and platforms like Houzz or Bark, the right questions to ask before choosing, and when each option makes sense. The Prices of Online Interior Design Services in 2026 The market has structured itself around clear service levels, each with a precise price and output. Quick consultation (€100-200) A video call with a professional, from 45 to 60 minutes, dedicated to a specific room. You receive guidance on layout, colours, materials and furniture. Does not include renderings or technical drawings. The right format for those who need direction on choices already underway, not for those designing from scratch. Restylit: Basic €129 (45-minute video call, PDF with guidance and product links). Consultation with 3D rendering (€200-500) The most requested format. Includes the consultation, the photorealistic rendering of the room and a shopping list with the specific products. You see how the space will look before buying anything. The right starting point for those furnishing one or two rooms. Restylit: Basic+3D from €249 (moodboard, photorealistic renderings, shoppable list). Complete project for renovation (€30-60 per sqm) The service for those who are renovating and need the complete project: layout, materials, renderings of every room, executive technical drawings to hand over to the contractor, complete shopping list. The format that replaces the project of a traditional physical studio. Restylit: Essential €35/sqm (minimum 100sqm, 3 video calls, renderings with 2 revisions, up to 4 technical drawings, shopping list). Restylit: Advanced €55/sqm (minimum 100sqm, 5 video calls, renderings with 3 revisions, up to 8 technical drawings, works cost estimate, remote artistic direction). Summary table of prices 2026 Format Indicative price Output Best for Quick consultation €100-200 Guidance, PDF Direction on current choices Consultation with 3D €200-500 Renderings, shopping list Furnishing 1-2 rooms Essential project €35/sqm (min. 100sqm) Renderings, technical drawings, shopping list Full renovation Advanced project €55/sqm (min. 100sqm) As Essential + cost estimate, artistic direction Renovation where nothing can go wrong Traditional physical studio €80-200/sqm Complete project with site visit Those who want continuous physical presence Online Interior Designer vs Physical Studio: The Honest Comparison This is the question most people ask themselves before deciding. The answer isn't "one is better than the other" but "it depends on the project." What actually changes The main difference between an online interior designer and a physical studio is not the quality of the project. It's the absence of the physical site visit and the associated operating costs, which in a traditional studio are passed on in the fee. 95% of the information needed to design a space well comes from a floor plan, photos and a video call conducted the right way. An experienced professional who knows the right questions to ask and can read a floor plan produces an equivalent project to a physical studio for the vast majority of standard residential projects. When online is the right choice For those renovating an apartment without particular structural complexities, for those furnishing from scratch, for those wanting to refresh one or more rooms without structural works: the online service offers the same result at a significantly lower cost. Timelines are faster, the process is more streamlined and everything can be managed from home. When the physical studio is the better choice There are situations where physical presence makes the difference: renovations with significant structural complexities, historic buildings with particular constraints, those who need weekly site supervision. In these cases a local professional who can go on site, check the execution and intervene in real time is worth the higher cost. The price comparison A complete interior design project with a physical studio in London or another major European city for a 100sqm apartment: €8,000-20,000. The same project with Restylit Advanced: €5,500. The same design quality, faster timelines, no geographic limitations. Online Marketplaces: A Different Category Those searching for an online interior designer often land on platforms like Houzz, Bark or similar. It's worth understanding that these are a completely different service category. These platforms are marketplaces: they connect clients with local freelance professionals. They are not interior design services — they are intermediation platforms. Quality varies enormously because it depends entirely on the individual professional selected. Prices are defined case by case through quotes. A structured online interior design service like Restylit is substantially different. The team is internal and coordinated by a specific professional — in Restylit's case, Mattea, a qualified architect. Prices are public and transparent, without quotes on request. The process is standardised with defined outputs: renderings, technical drawings, shopping list. Quality is consistent because it doesn't depend on the luck of the professional selected on a platform. The comparison in summary Characteristic Marketplace Structured service (Restylit) Who works on the project Freelancer selected by client Coordinated in-house team Prices Quote on request Public and transparent Quality Variable per professional Consistent Guaranteed outputs Depends on the agreement Defined in the package Site visit Often included Not included (remote) Geographic coverage Local All Italy and Europe Neither option is "better" in absolute terms. Those who need a local professional with a site visit can find good professionals on marketplace platforms. Those who want a structured service with guaranteed outputs, certain prices and a dedicated team get something different. The Questions to Ask Before Choosing Regardless of the platform or service, these are the concrete questions to ask before purchasing any interior design service. Who works on my project? An identifiable professional with a verifiable portfolio, or a generic "team of experts"? The answer significantly changes the expected quality. What exactly does the price include? Renderings yes or no? Technical drawings for the contractor yes or no? How many revisions? How many video calls? The price alone says nothing without knowing what it covers. Can I see the result before final delivery? The rendering presentation video call, where you see the project and can request changes before delivery, is the most concrete guarantee against unsatisfactory results. Does the project include technical drawings for the contractor? For those renovating, this is the difference between a project you can actually use on site and one that stays in a drawer. Are there verified reviews on third-party platforms? Testimonials on the company's own website aren't proof of quality. Reviews on Trustpilot, Google or other independent platforms are. Why the Timing of Contact Matters One thing we observe often is that people look for an online interior designer at the wrong moment: when the works have already started, when the sofa has already been bought, when the floor has already been laid. The online interior design service has the most value before any purchase or intervention. The photorealistic rendering shows how the space will look when everything can still be changed without cost. The shopping list indicates exactly what to buy, in what size and what finish, before walking into any shop. The technical drawings define the position of the systems before the walls are closed. Those who contact an interior designer with works already underway can still get value, but less than those who start from the project first. Evaluating an online interior design service and want to understand which format is right for your project? The free 15-minute introductory call is the place to make that assessment with no commitment. Book the free call → If you already know you're renovating and need a complete project, the Essential (€35/sqm) and Advanced (€55/sqm) packages include everything needed to take the project to site. Discover the Essential and Advanced packages → FAQ How much does an online interior design consultation cost? Prices range from €129 for a quick consultation with a video call and PDF, to €249 for a consultation with 3D rendering and shopping list, up to €35-55 per sqm for a complete executive project with technical drawings for the contractor. A complete project for a 100sqm apartment with a structured online service costs on average €3,500-5,500, compared to €8,000-20,000 from a traditional physical studio in major cities. What is the difference between an online interior designer and a marketplace platform? A marketplace platform connects clients with local freelance professionals. Quality depends on the individual professional selected and prices are defined through quotes. A structured online interior design service has a dedicated internal team, public and transparent prices, guaranteed outputs like renderings and technical drawings, and national geographic coverage. They are two different service models responding to different needs. Can an online interior designer support a renovation? Yes, for the design part: layout, materials, renderings, technical drawings to hand over to the contractor, shopping list. They cannot carry out physical site supervision — that requires physical presence and is entrusted to the contractor's site manager or a local technician. For the vast majority of standard residential projects, the online design part is sufficient to achieve a professional result. How do I choose between different online interior design packages? The choice depends on the type of intervention. For furnishing one or two rooms without works: Basic or Basic+3D consultation. For a complete renovation with a contractor: Essential or Advanced package depending on complexity. The main difference between Essential and Advanced is the number of technical drawings, the revisions included and the works cost estimate. A free call with the team helps identify which format is most appropriate for the specific project. Is it better to use an online interior designer or a physical studio? It depends on the project. For the vast majority of standard residential projects, the online service offers equivalent quality at significantly lower cost. A physical studio makes sense when you need a site visit, on-site presence, or a professional who knows specific local craftspeople and suppliers. The price difference between the two models is 60-70% in favour of online. Restylit is an Italian interior design company, entirely online. Photorealistic 3D renderings, shoppable lists, technical drawings for the contractor. Over 500 completed projects, 4.8/5 on Trustpilot. Discover all packages →
Learn more
What Our Clients Have Taught Us: Reading Reviews with Different Eyes
What really makes clients of an online interior design service satisfied? Honestly, when we started we didn't know for certain. We had hypotheses — rendering quality, speed, price — but the real answer came over time, reading what people write to us after each project. And it often surprised us. In short: what emerges from the reviews is not what we expected. People almost never talk about the rendering itself. They talk about how they felt during the process. About having been listened to. About seeing something they'd had in their heads for months finally become concrete. Why I Read Reviews Carefully Not to count the stars. I do it because reviews say things that clients don't say during the consultation, when they're still in the middle of the process and don't want to seem difficult or demanding. After delivery, when the pressure is over, people write what they really experienced. And that's where you understand what worked and, above all, why. A client wrote to us recently something that stayed with me: "I discovered Restylit through social media and immediately fell in love with the taste with which spaces and furnishings were combined. I was looking for someone who could organise my ideas and visions for a home with new floors, new paint colours and furniture to renew. With the Basic package, Mattea managed to give me professional and technical advice starting from references matching my taste and grouping them in an illustrated PDF with direct product links at the end of the video call. A truly complete and satisfying experience." The word that struck me most was "organise." Not "design," not "improve." Organise. This person already had the ideas. She was looking for someone to give them order. The Things That Surprised Us I've tried to gather the themes that come up most often in the reviews. Not to make a list of qualities, but because I find it genuinely interesting to understand what people remember from a design experience. "Finally someone who really listens" This phrase, or something very similar, comes up often. A client wrote: "She really knows how to listen to the client and her suggestions are never standard, but thought through specifically for the person." It made us reflect. Listening seems like the most obvious thing in the world, and yet evidently it isn't always. I don't know how good we are in absolute terms, but I know we try to start from there: understanding how the person lives, what isn't working now, how they want to feel when they come home in the evening. Before talking about colours or furniture. The fact that it's not a generic thing Another thing that comes up often is the surprise of receiving something personalised. As if people expected a standard answer and instead found something thought through for their specific space. It's not always like this — it would be dishonest to say so. But when it works, it works precisely because every project starts from that person's taste references, from that apartment's floor plan, from the light in those particular windows. The video calls that go beyond the time This one always makes me smile a little. A client wrote that they had 45 minutes and Mattea "went over by an hour and a half." It's not something we plan. It's what happens when you're inside a project and there's still something to resolve: you carry on. I'm not sure whether it's a strength or an organisational flaw — probably a bit of both. The PDF with the links at the end This is a detail we didn't think would matter so much, and yet it keeps coming up. The client who inspired this article mentions it explicitly: the document with the specifications and direct links to the products. Not a vague list of ideas but something you can buy immediately. It tells us how much people need concreteness. Not inspiration: instructions. Coming back for a second project Perhaps the thing that surprises me most and gives me the most satisfaction is when a client comes back. One wrote: "So satisfied that I purchased an additional consultation." I don't always know exactly what triggered that decision. I assume it's a combination of trust built over time and a result that convinced them. What We Still Don't Know I'd be dishonest if I pretended to have all the answers. There are things the reviews don't say, or only say in part. We don't always know what happens after the project is delivered. Whether the advice is followed, whether the contractor executes well, whether the final result matches the rendering. Sometimes clients send us photos of the finished home and every time it's a surprise: some homes come out better than we imagined, others a little less. It depends on a thousand variables we don't control. We don't know whether those who don't leave reviews are satisfied or not. Those who don't write are usually somewhere in the middle: neither enthusiastic nor disappointed. That grey area tells us little, and it weighs on us a bit. We don't know how much our advice actually changes the quality of life of those who receive it. This is the most important point and the one we have the least certainty about. We hope so. The logic says yes. But we don't measure it enough. Why I'm Telling You All This Not to seem humble or to do modesty marketing. I'm saying it because I think anyone evaluating an online interior design service deserves to know how it actually works, not just how it's presented. Restylit is not perfect. We have projects that could have gone better, clients we haven't fully satisfied, things we're still learning. But when I read reviews like the ones I've quoted, I find myself thinking we're going in the right direction. And that the right direction has to do, above all, with genuinely listening to people. If you want to understand whether Restylit is right for you, the free 15-minute call is the right place to start. No commitment, no pressure. Just a conversation about what you have in mind. Book the free call → If you're already convinced and want to get started, the Basic+3D consultation (from €249) includes photorealistic renderings, a shopping list with direct product links and a video call with an architect from the team. Discover the Basic+3D package → FAQ Are Restylit's reviews on Trustpilot verified? Yes. Trustpilot is an independent platform where companies cannot pay to hide or modify reviews. Anyone can write a review and they remain visible regardless of their content. Restylit has an average of 4.8 out of 5 across over a thousand clients. How does a Restylit consultation actually work? It starts with a free 15-minute introductory call. If you decide to proceed, you send the floor plan, photos of the spaces and visual inspiration. The team develops the project, which is presented in a video call with photorealistic renderings. At the end you receive a document with the specifications and direct links to the chosen products. The Essential and Advanced packages also include technical drawings for the contractor. Can I have a consultation even if I don't yet know exactly what I want? It's the most common situation. Most clients arrive with scattered ideas, visual references and a vague sense of the direction they want to take. The team's work in the first phase is precisely to bring order to that material. You don't need to arrive with clear ideas: you need to arrive with questions. How long does it take between booking and the project presentation video call? On average 30 days from when the material is received for Basic packages. For Essential and Advanced packages approximately 60 days, which includes the revision cycles and technical drawings. Restylit is an Italian interior design company, entirely online. We design residential and commercial spaces with photorealistic 3D renderings, shoppable lists and technical drawings for the contractor, across Italy and Europe. Over 500 completed projects, 4.8/5 on Trustpilot. Discover all packages →
Learn more
How to Choose the Right Interior Design Style for Your Home
How to Choose the Right Interior Design Style for Your Home How do you choose the right interior design style? Not by browsing catalogues until something "looks nice", but by starting from how you live and what isn't working in your current space. A style isn't an aesthetic you apply on top of an existing home: it's the visible result of coherent choices about materials, proportions and colours. Those who choose a style starting from an image almost always end up halfway through with something that doesn't quite convince them. In short: the right interior design style isn't chosen — it's discovered. It emerges from your habits, the materials you find pleasant to the touch, how many objects you need around you to feel at home, and how you want to feel when you walk through the door in the evening. What you'll find in this guide. The method for identifying your own style from concrete elements, the differences between the most popular styles in 2025, the mistakes made by those who change style every two years, and how Restylit supports this process in the early stages of every project. Why Choosing a Style Is Harder Than It Looks Style is the moment where almost everyone gets stuck. Not from a lack of ideas, but from an excess of stimuli. There are dozens of style labels: Scandinavian, japandi, wabi-sabi, industrial, mid-century modern, organic modern, coastal, cottagecore, covecore. New ones appear every year. The problem isn't finding a style you like. The problem is finding a style that works for how you actually live, that won't tire you after six months, and that can be applied to the specific space you have. A style chosen for aesthetics but not for lifestyle affinity almost always wears thin quickly. Someone who lives in a chaotic, dynamic way in an ultra-minimal Scandinavian home will struggle. Someone who loves collecting objects with stories in an empty industrial space won't recognise themselves. The style has to reflect who you are, not who you'd like to appear to be. The Method for Identifying Your Style These are the questions we ask at the start of every Restylit project to understand which direction to take. They're not questions about aesthetic preferences — they're about habits and feelings. How do you use your home during the week? Those who work from home need defined spaces for concentration. Those with young children need surfaces that are durable and easy to clean. Those who regularly host guests need a generous living zone. Those who live alone and spend a lot of time out can make more radical aesthetic choices. The way you use your home is the first filter for ruling out styles that simply can't work in your specific situation. Which materials do you like to touch, not just look at? This question always surprises people, but it's one of the most useful. There's an enormous difference between seeing raw concrete in a photo and living with raw concrete every day — running your hand over it, feeling the texture, accepting the imperfections. Those who find concrete cold and uncomfortable will never feel at ease in an industrial home, however beautiful the photos look. Those who love the roughness of natural materials won't feel comfortable among the lacquered surfaces of an ultra-contemporary apartment. How many objects do you need to feel at home? This is perhaps the most revealing question. Some people feel at ease in spaces with very few elements, where the empty space is part of the design. Others need books, plants, objects with history, things that say something about who they are. Neither is wrong: they're simply incompatible with certain styles. Someone who needs objects around them will never find a minimal apartment truly comfortable, however beautiful it looks in photos. Someone who feels suffocated by too much will never live well in a maximalist style, however carefully each individual piece is chosen. How do you want to feel when you come home? Cosy and protected. Free and airy. Stimulated and inspired. Calm and quiet. This answer is more useful than any aesthetic preference because it points to the emotional function the space needs to fulfil. And from that function, you work back to the style. The Most Popular Styles in 2025: What They Actually Are Once you've identified your direction through the questions above, a clear map of the most common styles helps you understand which one comes closest to what you're looking for. Style Key characteristics Who it works for Scandinavian Functional, natural light, light wood, neutral palette Those who want visual order and simplicity without coldness Japandi Japanese and Scandinavian fusion, wabi-sabi, natural materials, designed empty space Those who want calm and intentionality, few things chosen well Mid-century modern Organic forms of the 1950s-60s, wood, warm colours, iconic design Those who love design history and materials with character Organic modern Clean lines with earthy tones, natural materials, rounded forms Those who want a contemporary feel grounded in nature Industrial Concrete, metal, exposed brick, grey and dark palette Those who want an urban aesthetic and don't need warmth Coastal Light and airy, natural textures, soft blues and sandy neutrals Those who want a relaxed, breezy atmosphere Wabi-sabi Imperfection celebrated, materials that age well, nothing perfect Those who find beauty in imperfection and authentic materials Contemporary Fluid and updated, mixes elements from different styles with a common thread Those who want freedom without rigid rules The Mistake of Those Who Change Style Every Two Years There's a pattern we see repeat itself with many clients who come to us: they've already renovated or furnished once, but after two or three years the result no longer convinces them and they want to change everything. Almost always the problem wasn't the style chosen itself, but the way it was applied. A style copied from a magazine without understanding its principles becomes dated quickly because it follows the trend of the moment instead of reflecting who lives in that space. A style applied with coherence and depth, starting from who you are and how you live, doesn't tire. The wabi-sabi of someone who genuinely finds beauty in imperfection will last twenty years. The wabi-sabi chosen because it was trending in 2023 will already feel dated by 2026. The difference is the same as wearing something that reflects who you are versus wearing something because it's fashionable. Mixed Styles: When It Works and When It Doesn't Almost nobody lives in a home of pure style. Most homes contain elements of different styles, accumulated over time or chosen with different logics. Mixed styles work when there's a unifying element that holds everything together. It can be the colour palette, the materials, the proportions, or the number of objects. Without that unifying element, the mix simply becomes disorganised. The simplest way to make a mixed style work is to choose a material common thread. If all the materials are natural and matte, a mix of styles creates variety without fragmentation. If the palette is narrow and coherent, elements from different styles coexist without competing. How Restylit Helps You Find the Right Direction The first part of every Restylit project is not technical but exploratory. Before talking about materials, colours or renderings, we understand who lives in that space and how they live in it. The questions we ask, the images we invite clients to share, the problems we ask them to describe — everything serves to build a precise profile of what will work in that specific context. Not a catalogue style, but a tailored direction. The 3D rendering we then produce shows concretely how that direction translates into the real space, with the actual measurements, light and materials of that apartment. It's the most effective way to understand whether the chosen direction is truly the right one before buying anything. Can't work out which style suits you, or worried about choosing something that will tire quickly? The Basic+3D consultation (from €249) always starts from a conversation about how you live in your space, not from a catalogue of styles. Book now → For a first quick conversation with an architect about your stylistic direction, the Basic consultation (€129, 45-minute video call) is the right starting point. Discover the Basic package → FAQ How do you find out which interior design style suits you? You start from your habits, not your aesthetic preferences. The most useful questions are: how do I use my home during the week, which materials do I like to touch, how many objects do I need to feel at home, and how do I want to feel when I come home in the evening. The answers to these questions guide you towards a style that works long term, not just in photos. How many styles can you mix in a home? There's no precise number, but there's one necessary condition: there must be an explicit common thread holding the different elements together. It can be the colour palette, the materials or the proportions. Without that common thread, a mix of styles becomes visually chaotic even when each individual piece is of quality. Can your interior design style change over time? Yes, but a style born from who you are evolves naturally and gradually, not through complete breaks. Those who choose a style from genuine affinity update it over time by adding elements or changing details, without needing to start from scratch every three years. Those who choose a style for its trendiness find it dated as soon as the trend shifts. What's the difference between Scandinavian style and japandi? Scandinavian style prioritises functionality, natural light, light wood and a neutral palette with coloured accents. Japandi fuses Japanese minimalism, with its wabi-sabi and attention to imperfection, with Scandinavian comfort. Japandi tends to have less colour, more visual silence and greater attention to the quality of individual materials compared to classic Scandinavian style. Restylit is an Italian interior design company, entirely online. Photorealistic 3D renderings, shoppable lists, technical drawings for the contractor. Over 500 completed projects, 4.8/5. Discover all packages →
Learn more
Furnishing with Design Furniture Without Breaking the Bank: The Method That Works
Furnishing with Design Furniture Without Breaking the Bank: The Method That Works Can you furnish with designer furniture without a huge budget? Yes, but it requires understanding what "design" actually means and where it genuinely makes sense to spend. Design is not a synonym for expensive: it's a synonym for well-designed, functional, aesthetically coherent and durable. Many of the most expensive pieces on the market are not superior in build quality to their mid-range equivalents: you're paying for the name, the brand history or the exclusive distribution. In short: furnishing with a design aesthetic on a contained budget requires distinguishing the pieces where it genuinely makes sense to invest from those where you can be more selective. A quality sofa lasts fifteen years. An iconic lamp bought secondhand at half the price is still that lamp. The secondhand market, emerging brands and vintage are real resources, not fallbacks. What you'll find in this guide. Where to concentrate your spending for an authentic design result, how to recognise build quality, the lesser-known resources for finding design pieces at accessible prices, and the mistakes made by those who think design is only a matter of a high budget. Design Isn't Expensive: It's Well-Designed This is the point everything else depends on. Design, in its most precise sense, is the discipline that studies how objects and spaces can be functional, aesthetically coherent and structurally solid at the same time. A design object isn't necessarily expensive: it's considered. It has studied proportions, materials chosen in relation to function, a constructive logic that isn't accidental. An expensive design piece pays for the brand's history, international distribution, production costs in certain countries and marketing. A well-designed piece from an emerging brand made with the same materials and the same care, produced by a less well-known name, can cost half as much or less. The question isn't "how much does it cost?" It's "is it well-designed?" Where It Makes Sense to Spend More Not all pieces carry the same weight in the final result of a room. Some define everything else. Others are details only noticed up close. With a contained budget, the rule is to concentrate spending where impact is high and longevity is long. The sofa It's the most-used piece of furniture, the one that defines the visual tone of the living room, and the one that needs to hold up to years of daily use. A cheap sofa shows wear within two years. A mid-range sofa with a solid wood frame and spring cushioning lasts fifteen years. You don't need a sofa signed by a famous designer. You need a sofa with a solid structure, cushions that don't sink, and a durable cover material. This can be found from many mid-range Italian brands without paying the premium of big international names. The lamps The lamp is the design piece that more than any other visually transforms a space without requiring structural intervention. A lamp with a considered form, in a material with character, completely changes the perception of a room. It's also the piece where the secondhand and vintage market works best. Design lamps from the 1960s and 1970s, bought at antique markets or on online platforms, often cost less than new lamps of inferior quality and have a much higher aesthetic value. The table The table is a structural piece with a very long lifespan. A solid wood or marble table, chosen well, lasts decades and ages with character. A cheap chipboard table deteriorates within a few years and can't be recovered. Here too, the secondhand market often offers quality pieces at much more accessible prices than new. Where You Can Be More Selective Chairs Chairs have a high visual impact but a more contained cost than other structural pieces. There are chairs with a solid design and a considered aesthetic across many price ranges. The Tolix, the Eiffel chair in more accessible versions, natural rattan chairs: these are characterful choices that don't require a high budget. Storage and shelving Storage units serve a primarily practical function. A raw wood bookcase with simple forms and the right proportions works well visually without requiring a brand name. The attention goes to proportions, materials and construction details, not the label. Decorative objects The most characterful decorative objects are almost always those found by chance: markets, travels, antique shops, family heirlooms. They cost little or nothing and have a story. Expensive ones bought deliberately in a concept store almost never carry the same visual weight. Lesser-Known Resources for Accessible Design The quality secondhand market Vinted, Catawiki, eBay, local vintage markets and Facebook buy-and-sell groups are full of authentic design pieces at prices well below new. The trick is knowing what to look for: iconic brands that hold their value over time, pieces produced with recognisably quality materials, forms that don't date. Emerging Italian and European brands Italy has a tradition of furniture and design object production that extends well beyond the big international brands. There are dozens of small and medium Italian brands producing with the same artisanal care at significantly lower prices. They're not famous, but they're often better in build quality than many well-known names. Sales and end-of-season clearances Quality design brands have sales. The best periods are January and July. Many online brands also have outlet sections with end-of-collection pieces or items with minor cosmetic defects at greatly reduced prices. Collaborations with emerging designers Many accessible brands launch limited collaborations with emerging designers that produce pieces with a higher aesthetic level than their standard range. It's worth following these brands on social channels to stay informed. How to Recognise Build Quality Without Being an Expert These are the concrete signals to look for before buying a piece of furniture, regardless of price. Wood should be solid or quality plywood, not veneered chipboard. Chipboard is recognisable by its weight (very light) and its edges (often in PVC or printed paper). Quality plywood is heavy and has a uniform visible cross-section. Stitching on textiles should be regular and edges finished. A sofa with irregular stitching or frayed edges reveals low production quality regardless of price. Opening and closing mechanisms should be smooth. Sticking drawers, squeaking hinges, rigid mechanisms are all signals of low build quality. Weight is often a quality indicator. Furniture made from solid materials is heavy. Cheap materials are light. It's not an absolute rule, but it's a good starting point. The Project Before the Purchase: Even More Important on a Limited Budget With a contained budget, every wrong purchase weighs more heavily. A sofa bought without defining the layout first might be too large. A lamp chosen without defining the palette might not integrate. A bookcase bought in a hurry might have the wrong proportions for that space. With an interior design project, even in its simplest form, these mistakes are eliminated. You know exactly what dimensions you need, what palette every purchase must respect, what logic the material choices must follow. Every euro has a higher chance of going to the right place. Want to build a design aesthetic on a contained budget without getting the key pieces wrong? The Basic+3D consultation (from €249) includes a shopping list with the specific right products for your space, across different price ranges. Book now → To quickly understand what's worth spending on in your specific case, the Basic consultation (€129, 45-minute video call) is the most direct starting point. Discover the Basic package → FAQ What is design in furniture and why do some pieces cost so much? In its most precise sense, design is the discipline that studies how objects and spaces can be functional, aesthetically coherent and structurally solid at the same time. Expensive design pieces often pay for brand history, international distribution and marketing — not necessarily superior build quality compared to lesser-known brands. Which pieces of furniture are worth spending more on? The pieces with the best ratio between investment and longevity are the sofa, the dining table and the main lamps. These are the pieces that define the visual tone of a room, are used every day and need to hold up for years. For storage units, chairs and accessories, you can be more selective without sacrificing the overall quality of the result. Does the secondhand market work for design furniture? It works very well for iconic pieces and lamps. Brands with a history of quality hold their value over time and their secondhand pieces are often in excellent condition. Platforms such as Catawiki, eBay and local vintage markets frequently offer authentic pieces at much lower prices than new. How do you tell a quality piece of furniture from a cheap one before buying? The main signals are weight (solid materials are heavy), edge finishing (chipboard has PVC or printed paper edges), regularity of stitching in textiles and smoothness of opening and closing mechanisms. A piece that squeaks, has irregular edges or is unusually light almost always reveals low build quality. Restylit is an Italian interior design company, entirely online. Photorealistic 3D renderings, shoppable lists, technical drawings for the contractor. Over 500 completed projects, 4.8/5. Discover all packages →
Learn more
Home Decorating Ideas: How to Turn Inspiration into a Real Project
Home Decorating Ideas: How to Turn Inspiration into a Real Project How do you turn home decorating ideas into a concrete result? You start from the inspiration, you understand what's really behind the images you save, and you translate everything into specific choices for your own space. Inspiration alone is never enough. Pinterest and Instagram show finished results, not the process that produced them. Those who copy an image without understanding its logic almost always end up with something that doesn't work in their own apartment. In short: home decorating ideas are something nobody lacks. What's almost always missing is the method to go from a saved image to a real room. And that method always starts from one precise question: why do I like this photo? What you'll find in this guide. How to read inspirations in a useful way, how to understand what actually works in those images, how to adapt ideas to your own space and budget, and why the phase between inspiration and purchase is the most important one and the most often skipped. The Problem with Online Decorating Ideas Inspiration platforms have completely changed the way people approach interior design. Everything seems more accessible. You see a beautiful room, you identify the pieces, you search for where to buy them. The problem is that almost no interior design photo shows the reality of a space. It shows a staged space, photographed with wide-angle lenses that visually expand the room, in optimal lighting conditions and often with a ceiling height that simply doesn't exist in most apartments. Those who try to replicate those images without a critical filter almost always find themselves in the same situation: the result seems "almost right" but they can't figure out why it doesn't work like in the photo. The sofa is the same one, the rug is the same one, even the wall colour is similar. And yet something doesn't add up. What doesn't add up, almost always, is that the original proportions are missing, the original light is missing, and above all the project behind it is missing. How to Read an Interior Design Image in a Useful Way Looking at interior design images passively, saving what you like without asking yourself why, is the least useful way to use them. Looking at images actively, on the other hand, is one of the most powerful tools available for understanding what you actually want. These are the right questions to ask yourself in front of every saved image. What exactly do I like in this photo? Not "I like the room" but "I like how the light comes through that window" or "I like that there's nothing on the work surface" or "I like the contrast between the light wood and the dark metal." The more specific the answer, the more useful it is. Does this thing I like depend on the space or on the choice? The light coming through that enormous window depends on the apartment, not the designer. The contrast between wood and metal, on the other hand, is a choice that can be replicated almost anywhere. Separating the two helps you understand what's transferable to your own space and what isn't. What don't I like in this photo? This is a frequently overlooked question. Images that inspire almost always also contain elements that wouldn't be part of your own choices. Identifying them is just as important as identifying the ones you like. What feeling would I want to have in that room? Intimate and cosy, or open and luminous. Energetic or relaxing. This question goes beyond aesthetic taste and touches on the way you want to live in the space. The Hidden Pattern in the Images You Save There's something we often do in the early stages of a Restylit project: we ask the client to send us the images they've saved over recent weeks, without filters. Almost always a very clear pattern emerges. The images look much more alike than the client thinks. Same light temperature. Same materials. Same number of elements in the space. That pattern is the map of the result that person actually wants, often without being able to articulate it in words. If you look at your saved images right now and put them side by side, you'll probably notice that: 70 to 80% have the same background colour palette, almost always warm neutrals or deep tones, rarely both together. Most of the rooms in the images you like have fewer objects than you currently have in your home. The light in your favourite photos is almost always warm, diffused and coming from multiple sources, not from a single central ceiling light. These observations are already a project. Not yet complete, but a much more solid starting point than any shopping list. From Inspiration to Project: The Concrete Steps Translating ideas into a real project requires going through certain steps in order. Skipping one almost always moves the problem forward to a point where solving it costs more. First step: understand what you already have Before buying anything, take stock of what you have. Furniture, textiles, decorative objects, light sources. What works and can stay. What doesn't work but is recoverable with small interventions. What needs to go because it doesn't speak to the direction you want to take. Many people discover that 40 to 50% of what they need is already in the home, just badly positioned or combined with the wrong elements. Second step: define the layout Online decorating ideas almost never show the floor plan. But the layout is the first decision to make, before the wall colour and before any purchase. Where does the sofa go. How is the bed oriented. Where is the work zone created. Every other choice depends on this one. A wrong layout makes it difficult to make any furnishing work, even the most carefully chosen. A right layout makes even simple choices work. Third step: establish the palette Three colours at most, defined before buying anything. A dominant neutral for the walls and large surfaces. A tone of depth for the protagonist piece of furniture or a specific area. An accent in small doses in the details. This palette guides all subsequent purchases and prevents the space from becoming visually fragmented. Fourth step: build the list in order of priority Not everything needs to be done at once and not everything has the same weight on the final result. The high-impact items, such as the lighting, the colour of one wall and the right rug, come first. The low-impact items, such as small decorative accessories, come later or don't come at all. The Most Common Mistake: Buying Before Designing 90% of decorating mistakes come from one single problem: the purchase came before the project. You buy the sofa because it's on sale. You buy the rug because you finally find it in the right size. You buy the lamp because it's beautiful. Each of these purchases, made in isolation, seems like a good decision. Together, they almost never work the way you imagined. The project, even in its simplest form, is what puts all these elements in relation to each other before they're purchased. It doesn't have to be complicated. It has to come first. How Restylit Turns Your Ideas into a Project When someone comes to us with a folder of saved images and says "I want something like this," the first work we do is not to find the right furniture. It's to understand what's really in those images and how to transfer it to that specific space, with those measurements, that light and that budget. The final result is not the replica of a photo. It's something more precise: a space designed for that person, in that apartment, with their habits and way of living. The inspiration images are the starting point. The project is what makes them real. Do you have clear ideas about how you want your home to look but don't know how to turn them into a concrete project? The Basic+3D consultation (from €249) starts from your inspirations and shows you exactly how your space will look before you buy anything. Book now → For a quick discussion of your ideas with an architect, the Basic consultation (€129, 45-minute video call) is the right starting point. Discover the Basic package → FAQ How do you find original home decorating ideas? Original ideas almost always come from carefully observing what you already have and how you live in the space. Before looking for inspiration externally, it's worth understanding what isn't working in the current configuration and why. Online images are useful for identifying the aesthetic direction, but the project must start from the real space, not from an ideal image. How many ideas should you collect before starting to buy? It's not a question of quantity but of clarity. When the collected images show a clear pattern, meaning the same palette, the same materials, the same number of elements, you have enough to start designing. Collecting hundreds of images without finding that pattern doesn't help: it adds confusion instead of clarifying the direction. Is it possible to mix different styles without it looking chaotic? Yes, but it requires a precise common thread. That thread can be the colour palette (all neutrals with accents of the same tone), the materials (all with natural texture) or a proportional logic (all low furniture, for example). Without an explicit common thread, mixing styles almost always produces visual confusion. Where do you start when you have too many ideas and can't choose? From the layout. It's the decision that precedes all others and that doesn't depend on style. Defining where each piece of furniture goes in relation to the others and to the circulation flows immediately clarifies many of the subsequent choices. Often you discover that ideas that seemed incompatible become compatible once the layout is defined. Restylit is an Italian interior design company, entirely online. Photorealistic 3D renderings, shoppable lists, technical drawings for the contractor. Over 500 completed projects, 4.8/5. Discover all packages →
Learn more
Come Ottimizzare gli Spazi in una Casa Piccola: Il Metodo che Usano i Professionisti
Come Ottimizzare gli Spazi in una Casa Piccola: Il Metodo che Usano i Professionisti Come si ottimizzano gli spazi in una casa piccola? Lo si fa con un metodo che parte sempre dalla stessa domanda: ogni centimetro di questa casa sta facendo il suo lavoro? Lo spazio non è mai davvero finito — quasi sempre viene sprecato, in modi che non si notano finché qualcuno non li indica. Il professionista non crea spazio dove non c'è: riorganizza quello che esiste per farlo funzionare meglio. In sintesi: ottimizzare gli spazi in una casa piccola non significa comprare mobili salvaspazio o sistemare contenitori colorati. Significa progettare ogni scelta, dal layout all'illuminazione, in modo che ogni metro quadro produca il massimo risultato visivo e funzionale. Cosa trovi in questa guida. I principi di progetto che i professionisti applicano agli spazi piccoli, le cinque categorie di spreco più comuni, come la luce e i colori influenzano la percezione della dimensione, le soluzioni che funzionano davvero e quelle che sembrano intelligenti ma non lo sono, e quando un progetto professionale fa la differenza che nessun acquisto da solo può fare. Perché gli Spazi Piccoli Sono più Difficili, Non più Semplici Esiste un malinteso diffuso sulle case piccole: si pensa che richiedano meno progetto perché c'è meno da decidere. È vero il contrario. In uno spazio piccolo, ogni errore si vede. Un mobile fuori scala blocca visivamente la stanza. Un colore sbagliato abbassa il soffitto. Un tappeto troppo piccolo frammenta lo spazio in modo irreversibile. Un punto luce mal posizionato crea un'ombra che fa sembrare l'angolo più stretto di quanto sia. Negli spazi grandi questi errori si assorbono. Negli spazi piccoli si sommano, e il risultato è una casa che sembra sempre più piccola di quanto sia nella planimetria. Il paradosso degli spazi piccoli è che richiedono più decisioni consapevoli, non meno. I Cinque Errori più Comuni negli Spazi Piccoli Prima di aggiungere qualcosa, vale la pena capire cosa si sta perdendo. Questi sono i cinque modi più frequenti in cui gli spazi piccoli vengono sprecati. 1. La verticalità non sfruttata In quasi tutte le case piccole che seguiamo, le pareti sopra i 180cm sono vuote. Scaffali, pensili, contenitori alti: tutto finisce all'altezza degli occhi o più in basso. Ma lo spazio che va dal metro e ottanta al soffitto è spazio reale, spesso inutilizzato. Una libreria che arriva al soffitto non occupa più pavimento di una libreria bassa: occupa la stessa impronta ma produce tre volte la capacità di contenimento. 2. L'ingresso non progettato L'ingresso è quasi sempre il primo spazio sacrificato nelle case piccole. Si pensa: "è solo un corridoio, non c'è niente da fare." In realtà è uno degli spazi con il più alto potenziale. Una panca con contenitore, un sistema di appendiabiti a parete, uno specchio che riflette la luce: interventi semplici che trasformano un non-luogo in uno spazio che funziona. 3. Lo spazio sotto i mobili non usato Letti senza contenitore, divani a terra, comodini pesanti. Tutto quello che non ha le gambe o non ha cassetti nasconde spazio prezioso. In una casa piccola, ogni mobile deve fare almeno due cose. 4. Il corridoio lasciato vuoto I corridoi non sono spazio morto: sono spazio lineare con pareti. Scaffali a spessore ridotto lungo un corridoio possono contenere centinaia di libri, oggetti o attrezzatura senza ridurre la larghezza di passaggio in modo significativo. 5. Gli angoli ignorati Gli angoli sono gli spazi più difficili da usare e quelli più spesso abbandonati. Ma un angolo con una lampada, una pianta e una seduta bassa diventa un covecore funzionale. Un angolo con scaffali su misura diventa storage. Non tutti gli angoli si possono ottimizzare, ma quasi tutti si possono usare meglio di come vengono lasciati. I Principi di Progetto per gli Spazi Piccoli Questi sono i principi che guidano le scelte nei progetti Restylit quando si lavora su superfici contenute. Non sono consigli generici: sono criteri che cambiano il risultato in modo misurabile. Continuità visiva prima di tutto Ogni interruzione visiva rimpicciolisce lo spazio. Un cambio di colore tra la stanza e il corridoio. Un tappeto che non scala con il divano. Un mobile che blocca la linea visiva verso la finestra. La continuità, intesa come stessa palette, stesso materiale del pavimento, stessa direzione delle linee, fa sembrare lo spazio più grande senza cambiarne le dimensioni. Ogni mobile deve avere almeno una doppia funzione In una casa piccola, un mobile che fa una sola cosa è un lusso che ci si può permettere raramente. Il letto con contenitore sotto. La panca dell'ingresso con cassetti. Il tavolo allungabile che di giorno è consolle e di sera è tavolo da sei. Il pouf che è seduta, appoggio e contenitore. Ogni pezzo deve guadagnarsi il suo posto. I mobili leggeri visivamente ampliano Un divano con le gambe lascia vedere il pavimento sotto. Una libreria in metallo sottile non blocca la luce. Un tavolo in vetro non divide lo spazio. La leggerezza visiva, intesa come possibilità per l'occhio di passare attraverso o sotto i mobili, amplia la percezione dello spazio in modo immediato. Le linee verticali alzano il soffitto Tutto quello che guida l'occhio verso l'alto fa sembrare la stanza più alta. Scaffalature alte, tende montate vicino al soffitto e che arrivano a terra, quadri allungati in verticale, pannelli decorativi a listelli verticali. Il soffitto percepito è molto più alto di quello reale quando le linee verticali lo suggeriscono. La luce distribuita in più punti amplia Una sola fonte di luce al centro del soffitto crea ombre agli angoli che li fanno sembrare più vicini. Luci distribuite su più punti, a diverse altezze, illuminano gli angoli e aprono lo spazio. In una casa piccola, l'illuminazione non è un dettaglio decorativo: è uno strumento di progetto. Come Luce e Colori Influenzano la Percezione dello Spazio Questa è la parte che produce i cambiamenti più radicali con il minor costo. I colori chiari riflettono, quelli scuri assorbono I colori chiari sulle pareti riflettono la luce e fanno sembrare lo spazio più grande. I colori scuri assorbono la luce e fanno sembrare lo spazio più raccolto. Nessuno dei due è sbagliato: dipende dall'effetto che si vuole. In una stanza piccola e buia, un colore chiaro e caldo amplifica la poca luce disponibile. In una stanza piccola ma con buona luce naturale, un colore scuro può creare profondità invece che claustrofobia. Il colore continuo unifica Dipingere le porte dello stesso colore delle pareti, estendere il colore anche sul soffitto, usare la stessa palette in ambienti comunicanti: queste scelte eliminano le interruzioni visive che frammentano lo spazio. Il colour drenching, ovvero il rivestimento totale di un ambiente in un unico tono, è una delle tecniche più efficaci per far sembrare uno spazio piccolo più intenzionale e meno compresso. La luce a 2700K scalda e apre La temperatura colore della luce artificiale cambia radicalmente come si percepisce uno spazio. Una luce a 2700K, calda e morbida, fa sembrare le stanze più grandi e più accoglienti. Una luce fredda a 4000K o superiore crea un'atmosfera da ufficio che rende ogni spazio, grande o piccolo, meno piacevole da abitare. Lo specchio: dove funziona davvero Uno specchio posizionato di fronte a una finestra raddoppia la luce naturale percepita e crea una profondità visiva che non esiste fisicamente. Uno specchio posizionato su una parete buia senza finestre riflette solo buio e non aiuta. La posizione è tutto. Le Soluzioni che Sembrano Intelligenti ma Non lo Sono I letti a soppalco negli adulti Funzionano bene nei bambini e nei teenager. Negli adulti, il sacrificio in comfort e praticità raramente vale il guadagno di spazio al di sotto, specialmente se il soffitto non è abbastanza alto da rendere il piano superiore vivibile. I mobili multifunzione di bassa qualità Il divano letto economico che non dorme bene come divano e non è comodo come letto. Il tavolo pieghevole che traballa. La sedia che diventa scala che non regge il peso. I mobili multifunzione funzionano solo se la qualità costruttiva è adeguata: altrimenti producono frustrazione invece di spazio. Troppi specchi piccoli Un mosaico di specchetti decorativi su una parete non amplifica la percezione dello spazio come uno specchio grande. Frammenta la riflessione e crea rumore visivo. Un grande specchio batte sempre cinque piccoli. I contenitori colorati e visibili I sistemi di organizzazione colorati rendono lo spazio visivamente più caotico, non più ordinato. In una casa piccola, i contenitori devono essere neutri o nascosti, non decorativi. Quando Serve un Progetto Professionale C'è un punto in cui la somma dei singoli consigli non basta più e serve una visione d'insieme. Quel punto arriva quando si inizia a comprare soluzioni una alla volta e ci si accorge che non si risolvono i problemi o che ne creano di nuovi. Quando lo spazio sembra "quasi a posto" ma non si riesce a capire perché non funziona. Quando ci sono vincoli strutturali che richiedono di scegliere tra opzioni diverse con conseguenze a lungo termine. Un progetto di interni su una casa piccola non è un lusso: è spesso l'unico modo per ottenere il massimo da ogni metro quadro disponibile, senza sprechi e senza rimpianti. La tua casa piccola non ti convince ma non sai da dove iniziare? In Restylit partiamo dalla planimetria e dalle foto e ti mostriamo, con un rendering fotorealistico, come ogni spazio può funzionare meglio. La consulenza Basic+3D parte da €249. Prenota ora → Per un confronto rapido su come ottimizzare uno spazio specifico, la consulenza Basic (€129, videocall 45 minuti) è il punto di partenza più diretto. Scopri il pacchetto Basic → FAQ Cos'è la doppia funzione nei mobili e perché è importante nelle case piccole? La doppia funzione indica la capacità di un mobile di svolgere due utilizzi distinti nello stesso spazio: un letto con contenitore sotto assolve alla funzione di dormitorio e di storage, un tavolo allungabile serve da consolle e da tavolo da pranzo, un pouf è seduta e appoggio. In una casa piccola, ogni mobile che fa una sola cosa occupa spazio che potrebbe fare di più. Quale colore fa sembrare più grande una stanza piccola? I colori chiari e caldi, come il bianco avorio, il beige sabbia e il grigio chiaro caldo, riflettono meglio la luce e ampliano la percezione dello spazio. Il bianco puro freddo funziona meno bene perché riflette in modo metallico. In alcuni casi, un colore scuro applicato in modo coerente su tutte le superfici, incluso il soffitto, crea una percezione di profondità e intenzionalità che non rimpicciolisce lo spazio ma lo rende più raccolto. Come si sfrutta la verticalità in una casa piccola? Portando le scaffalature e i contenitori fino al soffitto invece di fermarsi all'altezza degli occhi. Montando le tende vicino al soffitto invece che sopra la finestra. Usando quadri o pannelli decorativi verticali invece che orizzontali. Ogni elemento che guida l'occhio verso l'alto fa sembrare il soffitto più alto e la stanza più spaziosa. I mobili multifunzione funzionano davvero? Funzionano quando la qualità costruttiva è adeguata all'uso. Un divano letto di qualità che dorme bene e ha un aspetto curato come divano è una soluzione reale. Un divano letto economico che non soddisfa nessuna delle due funzioni crea frustrazione. La regola è: i mobili multifunzione costano di più dei mobili singola funzione della stessa qualità, ma ne vale la pena se lo spazio lo richiede. Restylit è una interior design company italiana, interamente online. Rendering 3D fotorealistici, shopping list acquistabili, disegni tecnici per l'impresa. Oltre 500 progetti completati, 4.8/5. Scopri tutti i pacchetti →
Learn more
Decorating in Scandinavian Style: What It Really Is and How to Apply It in an Italian (or Any European) Apartment
Decorating in Scandinavian Style: What It Really Is and How to Apply It in an Italian (or Any European) Apartment How do you decorate in Scandinavian style? Simple! (just kidding — nothing is ever simple or obvious when it comes to interior design). Anyway, you do it by maximising natural light, using warm materials like light wood and linen, building a neutral palette with very few accents, and following a functional logic that puts practicality before aesthetics. Scandinavian style is not what you see in IKEA catalogues: it's an approach to domestic living born in countries with little sun and long winters, where home has to be a place where you feel good regardless of external conditions. In short: authentic Scandinavian style has three characteristics that almost no article mentions. The first is that it starts from function, not aesthetics. The second is that it uses colour intentionally, not to fill space but to create contrast. The third is that it ages well because it follows principles, not trends. What you'll find in this guide. The origins and principles of Scandinavian style, the difference between authentic Nordic and catalogue Nordic, how to adapt it to apartments with their specific characteristics, the right palette and materials, and the most common mistakes made by those who try to replicate it without understanding its logic. Where Scandinavian Style Comes From and Why It Works Scandinavian style emerged from a precise necessity: in Nordic countries, natural light hours are very few for many months of the year. Homes have to compensate for this absence through design choices that maximise available light, create visual warmth and make spaces pleasant to live in even during the darkest months. From this necessity emerge the principles we recognise as characteristic of the style: large windows often without heavy curtains, light colours on walls that reflect light, warm materials like light wood, wool and linen that compensate for cold light, and carefully considered artificial lighting distributed across multiple points. What has made Scandinavian style so globally influential is that these principles work extremely well outside their original context too. An apartment in London or Paris with little natural light benefits from the same considerations as a Swedish home. An apartment with low ceilings benefits from the same visual techniques that Nordic designers developed to compensate for the lack of light. The concept of hygge, which in Danish refers to that feeling of warmth, comfort and intimate wellbeing, isn't just a romantic idea: it's a practical philosophy that translates into precise choices about lighting, materials and the organisation of spaces. The Difference Between Authentic Nordic and Catalogue Nordic This is the distinction that changes everything, and almost no article makes it clearly enough. Catalogue Nordic is made of white furniture with light wood legs, terracotta pot plants, motivational quote prints in black frames, and white and grey cushions on every surface. It's a style you can buy in one afternoon and one that dates quickly, too quickly, because it follows a trend rather than expressing principles. Authentic Nordic is genuinely different. It has fewer objects, chosen with more care. Authentic Nordic design pieces aren't the ones you find everywhere: they have a history, a reason to be there, and are often made by craftspeople or brands with a precise tradition. It has more texture and less colour. Authentic Nordic compensates for the simplicity of the palette with a richness of materials. Which ones? Well: raw linen, thick-woven wool, wood with visible grain, irregular ceramics. Sensory complexity replaces chromatic complexity. The lighting? Designed, not added. Nordic lamps are not decorations — they're tools. Their position, their height, their colour temperature are precise choices that create the hygge atmosphere rather than simply illuminating the ceiling. Intentional empty space is another very important element. Authentic Nordic spaces have deliberately empty zones. Not because the furniture is missing, but because the empty space is part of the design: it creates breathing room, reduces visual stress and valorises what is there. How to Adapt It to Your Apartment Apartments in many European cities have specific characteristics that make adapting Scandinavian style a mission that's not simple at all. The differences to manage Apartments in historic city centres often have higher ceilings than Nordic homes. This is an advantage: Scandinavian style, born to compensate for typically compact spaces, expands well vertically. Natural light in Southern Europe is much more abundant than in Scandinavia for most of the year. This means the light colours used in Nordic style, which in Northern countries serve to reflect the limited available light, can feel excessively bright during the middle of the day in a sunnier climate. It's worth considering slightly more saturated tones or more light-absorbing materials to balance. The climate in much of Europe requires different solutions for ventilation and materials. The heavy textiles typical of Nordic style, thick wool and velvet, are perfect in winter months but can be uncomfortable in summer. Planning for interchangeable textiles — linen in summer and wool in winter — is the smartest approach. The similarities to leverage Italian and wider European design culture shares many points of contact with Nordic design: attention to material quality, appreciation of craftsmanship, preference for objects that last over time. These shared values make the integration between the two much more natural than it might seem. The Nordic Palette: White Is Not the Only Colour The most widespread misconception about Scandinavian style is that it's synonymous with total white. It isn't, and understanding this difference is important for an authentic result. The Nordic palette unfolds across three levels. The base is a dominant neutral, almost always warm white, warm ivory or very light grey. Not cold plasterboard white: a white with a warm undertone that reflects light without glaring. The natural tones are almost always the second level: sandy beige, grey, light brown, dove grey. These colours appear in the materials, textiles and wooden furniture. They're not decorative additions but the natural result of the materials chosen. The accents are used sparingly and intentionally. Moss green, teal, muted terracotta, matte black. No more than two accents per room, used on individual pieces or in small doses in textiles. The result is not a colourless space: it's a space where every colour has a precise reason to be there. The Right Materials for Scandinavian Style Material Where it's used Why it works Light wood (ash, pine, birch) Floors, furniture, details Visual warmth, reflects light Natural linen Curtains, cushions, bedspreads Texture, breathable, ages well Thick-woven wool Throws, rugs, cushions Tactile warmth, acoustic absorption Irregular ceramics Decorative objects, lamps Visible craftsmanship Matte metal (black, brass) Details, furniture legs, lighting Contrast without weight Natural stone or stone effect Floors, worktops Connection with nature Transparent glass Tables, doors, accessories Visual lightness The Most Common Mistakes — They Happen to Everyone! Too much white, too much emptiness. Authentic Nordic has white but also texture, warm materials and carefully chosen objects. Pure white on every surface without contrasting materials creates a clinical atmosphere, not a Nordic one. Plants as the only natural element. Plants in Nordic interiors are present but not dominant. The connection with nature happens primarily through materials — wood, stone, wool, linen — not through a large number of pots. Typographic prints. Prints with phrases in Danish or English on white backgrounds have become a recognisable cliché. Authentic Nordic style uses art with abstract forms, colours or landscapes, not motivational typography. Ignoring artificial lighting. Scandinavian style without designed lighting doesn't work. Candles, floor lamps with linen shades, pendants in natural materials are as essential as the wall colour. Using only IKEA. IKEA has democratised the Nordic aesthetic, but IKEA pieces alone produce a result that reads as "IKEA", not necessarily as authentic Nordic. Mixing a well-chosen IKEA piece with higher-quality vintage or artisanal objects is the right strategy. Want to bring Scandinavian style into your apartment but don't want the catalogue result? At Restylit we often work on exactly this kind of project: defining a version of Nordic style that is genuinely yours, with the right materials and proportions for your specific space. The Basic+3D consultation starts from €249. Book now → To quickly understand where to start, the Basic consultation (€129, 45-minute video call) is the most direct starting point. Discover the Basic package → FAQ What is Scandinavian style in interior design? Scandinavian style is an approach to domestic design developed in Nordic countries, characterised by maximised natural light, warm materials like light wood and natural textiles, a neutral palette with very few accents, and a functional logic that prioritises comfort and practicality. It's not a catalogue aesthetic but a system of design principles born from the necessity of creating spaces that are pleasant to live in climates with little light. What's the difference between Scandinavian style and japandi? Scandinavian style prioritises comfort and warmth, with soft materials, multiple light sources and a sense of welcome expressed through the concept of hygge. Japandi, a fusion of Japanese and Scandinavian, adds the principle of wabi-sabi — the celebration of imperfection — and tends to have fewer objects, more visual silence and a slightly darker palette. Nordic is warmer and more welcoming; japandi is more contemplative and essential. What colours are used in Scandinavian style? The Nordic palette is built on a dominant neutral (warm white, very light grey, ivory), the natural tones of the materials (beige, greige, light brown, dove grey) and a maximum of two accents used sparingly (moss green, teal, muted terracotta, matte black). Pure cold white alone is not typically Nordic: it's warm whites and natural textures that create the characteristic atmosphere. Does Scandinavian style work in a home with a lot of sunlight? It works very well, with some adaptation. Abundant natural light makes maximising light reflection less necessary, so you can work with slightly more saturated tones than classic Nordic. Materials should also be chosen with the climate in mind: lighter textiles like linen are preferable in summer compared to the thick wool typical of Nordic winter interiors. Restylit is an Italian interior design company, entirely online. Photorealistic 3D renderings, shoppable lists, technical drawings for the contractor. Over 500 completed projects, 4.8/5. Discover all packages →
Learn more